Deckbuilding 101
Practical tools, checks and reference points for building Old School decks.
Know What Your Deck Is Trying to Do
A good deck starts with a plan, not with a pile of good cards.
Before worrying about the exact numbers, the mana base or the sideboard, you should be able to answer one simple question:
That answer does not have to be complicated. Maybe you want to put your opponent under pressure from the first turn. Maybe you want to land an early threat and protect it with disruption. Maybe you intend to trade resources, control the game and win once your opponent has run out of meaningful plays.
The important part is that the cards in your deck are working toward the same goal. A powerful card is not automatically the right card. If it does not help execute your plan, it may simply be taking up a slot that could be doing something more useful.
Think About the Game You Want to Play
How do you intend to win?
What actually ends the game? Creatures? Burn? A large threat? A combo? Gradually taking complete control?
What should the first turns accomplish?
An aggressive deck wants pressure. Control wants development and answers. Tempo often wants one threat and then just enough disruption to stay ahead.
What does the deck need to function?
Some decks need a specific colour early. Others need a certain interaction, permanent or type of card. Those requirements shape the curve and the numbers.
The Three Core Archetypes
Aggro — Apply Pressure
Aggro decks want to end the game before the opponent has time to fully develop their own plan. They use cheap, efficient threats and often direct damage to keep the opponent under constant pressure.
Old School examples: Lestree Zoo, Erhnam Burn’Em, Sligh, Stompy.
Control — Take Over the Game
Control decks are willing to play a longer game. They answer threats, disrupt the opponent and generate card advantage until the opponent can no longer meaningfully fight back.
Old School examples: The Deck, Artifact Toolbox and other dedicated control shells.
Combo — Assemble the Engine
Combo decks are built around a particular interaction between cards. Rather than winning through conventional combat, they try to assemble the pieces necessary to create an overwhelming advantage or end the game outright.
Old School examples: Twiddlevault, Eureka!, Lich / Mirror Universe strategies.

Related Strategic Approaches
Not every Old School deck fits neatly into one of the three core archetypes. Some strategies combine elements of different archetypes, while others approach the game from a different strategic angle.
Midrange
Uses efficient threats, removal and flexible cards, changing roles depending on the matchup. Against faster decks it may become the control deck; against slower decks it becomes the aggressor. Example: Deadguy Ale.
Tempo / Aggro-Control
Establishes an early advantage and then uses disruption to prevent the opponent from catching up. Example: Counterburn or certain RUG builds.
Prison / Lock
Attacks the opponent’s ability to play the game normally by restricting mana, permanents or available actions. Example: Stasis.
Your Deck Needs to Know Which Game It Is Playing
You do not need to force every deck into a perfect label. The purpose of identifying an archetype is simply to make the plan clearer.
If you are building an aggressive deck, your card choices should help you apply pressure. If you are building control, you need enough answers and staying power to reach the late game. If you are building combo, you need the right balance between combo pieces, ways to find them and ways to protect them.
Once you know what kind of game your deck wants to play, choosing the cards becomes much easier.
Make Sure Your Deck Can Actually Play Its Game
Once you know what your deck is trying to do, the next question is when it needs to do it.
That is what the mana curve is really about. A mana curve is more than a graph showing how many one-, two-, three- and four-mana spells are in your deck. It describes the sequence in which your deck wants to operate.
If your plan is to put the opponent under pressure immediately, your deck needs meaningful plays in the opening turns. If you are building control, you may be perfectly happy playing expensive cards later — but you still need enough early interaction to survive long enough to cast them.
What Should Your First Turns Look Like?
Try to imagine an average opening hand and the first few turns of a game.
Act Early
Most of the action belongs near the bottom of the curve. Missing the first or second turn can give the opponent exactly the time they need to stabilise.
Develop Smoothly
You can afford slightly more expensive threats, but still need useful early plays. Strength often comes from moving smoothly from disruption into pressure.
Reach the Late Game
A higher curve does not mean doing nothing early. Removal, counters, mana development and card selection are what allow the deck to reach its powerful end game.
Build Toward the Engine
The relevant curve may be about when the engine can be assembled and how much mana must remain available to protect it.
There is no perfect curve that fits every deck. There is only a curve that fits your plan.
Think in Turns, Not Just Mana Costs
Instead of asking only “How many two-drops do I have?”, ask “What do I want to be doing on turn two?”
Look at the cards competing for the same part of the game. If half your hand regularly consists of three- and four-mana spells, something has to wait. If your deck wants to attack immediately but has very few turn-one plays, the deck and the plan are working against each other.
The curve should help your cards arrive in the order in which they matter.
Coloured Mana Is Part of the Curve
A 2C spell and a 1CC spell both cost three mana, but they do not place the same demands on your mana base.
Casting a spell with one coloured symbol is relatively forgiving. Casting a spell with two, three or even four symbols of the same colour requires considerably more reliable access to that colour.
If you want a spell to be part of your curve, your mana base must be able to cast it on that curve.
The Colored Mana Sources Cheat Sheet
The cheat sheet below is based on the work of Frank Karsten, whose mathematical analysis of Magic mana bases has helped players determine how many colored mana sources they need to reliably cast their spells on curve. Karsten has continued to develop and refine this work over the years, resulting in several versions of his mana-source tables.
For this Old School deckbuilding guide, I’ve chosen the version that I think translates best to the format: a straightforward probability table that lets you compare a spell’s mana cost with the number of colored sources in your deck.

Using the Colored Mana Sources Cheat Sheet
The notation is deliberately simple: C is one coloured mana, CC is two mana of the same colour, CCC is three, while 1CC is one generic plus two of the same colour.
The number on the left represents how many reliable sources of that colour are available in the deck. The percentages show how likely you are to have the required coloured mana available when that spell is meant to be cast on curve. The highlighted cells provide a practical benchmark.
So if an important spell costs 1CC, do not simply ask whether your deck has enough total mana sources. Ask whether it has enough sources of that particular colour to reliably produce two coloured mana by turn three.
How Many Lands Do You Need?
Colored mana is only one side of the equation. You also need enough mana sources overall to make your deck function.
A deck may have enough blue sources to cast Counterspell, yet still struggle if it does not hit enough land drops to reach its key turns. In the same way, a deck may have enough black sources for Hypnotic Specter, but still fail to operate smoothly if the total mana base is too light.
The reference below is meant as a practical starting point for overall land count in a 60-card Old School deck.

What Counts as a Mana Source?
Not all mana sources are equal. When counting colored sources, use the following rules of thumb:
- Mana Dorks (e.g., Birds of Paradise / Llanowar Elves): 0.5 colored source (discounted because they are vulnerable and require a turn to come online).
- Moxen (e.g., Mox Sapphire / Mox Jet): 1.0 colored source for the color they produce.
- Colored Mana Rocks (e.g., Fellwar Stone): 0.75 colored source if they can reliably produce the required color.
- Colorless Mana Rocks (e.g., Sol Ring, Mana Vault, Basalt Monolith): 0 colored sources. They provide acceleration, but do not help meet colored-mana requirements.
- Temporary Acceleration (e.g., Dark Ritual / Black Lotus): 0 colored sources. They provide a temporary burst of mana, but should not be counted as reliable colored sources.
- Colorless Lands: 1 total mana source, but 0 colored sources.
For overall land count, cheap ramp and acceleration can justify playing fewer lands. As a rough starting point, every 3–4 cheap acceleration cards may allow you to reduce the deck by about 1 land, depending on how reliable that acceleration is.
Colored Sources Are Not the Same as Total Mana Sources
Colored sources tell you whether your deck can produce the right colors when you need them. Total mana sources tell you whether your deck has enough mana overall to function.
A deck can have enough lands in total but still struggle to cast a CC spell because too few of those lands produce the required color. The reverse can also happen: you may have enough sources of a particular color, but simply not enough mana sources overall to consistently reach four or five mana.
Building the Mana Base
Once you know what you want to cast and when you want to cast it, you can start translating those requirements into an actual mana base. The goal is not simply to reach a certain number of lands. Your mana sources need to support the colours and timing your deck demands.
Lands vs. Acceleration
Moxen, Sol Ring and other acceleration can help you get ahead on mana, but they do not always replace lands one-for-one. The deck still needs enough reliable sources when the explosive draws do not happen.
Coloured Sources
Count the sources that can actually produce each colour. A deck may contain plenty of mana overall and still struggle to cast a CC or 1CC spell on time.
Fixing
Dual lands and City of Brass make multicolour decks much more consistent, but every additional colour still asks something from the mana base.
Colourless Lands
Strip Mine, Mishra’s Factory and Library of Alexandria can be extremely powerful, but they occupy land slots without helping you cast coloured spells.
A colour you only need for a late-game spell requires less support than a colour you must produce on turn one.
How Many Copies Do You Actually Need?
Once you know what your deck is trying to do, and when it wants to do it, the next question is how often you need to draw each card.
Putting four copies of a card in your deck is not simply saying that the card is good. It means that you want to see that card often and early. Playing one or two copies means something very different.
The number of copies should reflect the role a card plays in your plan.
I want to see this regularly
Usually central cards, strong in multiples, or cards that are important in the opening turns.
I want it often
Important, but perhaps slightly expensive, situational or less attractive in multiples.
I want access to this effect
Supporting cards, expensive threats, narrow answers or cards that become worse when you draw the second copy.
This is a specialist
Particularly important in Old School because so many of the most powerful cards are restricted, and search effects can increase access to single copies.

Build With Effects, Not Just Card Names
Suppose your deck needs an early removal spell. You may not specifically need Lightning Bolt every game. What you actually need is cheap interaction.
Four Bolts plus additional removal spells can give the deck much more reliable access to that function than four copies of one card alone. The same logic applies to threats, mana acceleration, disruption and combo pieces.
The Hypergeometric Formula
The math behind these probabilities is called the hypergeometric distribution. It calculates the probability of drawing a certain number of target cards from a deck when cards are drawn without replacement.
Exact number of copies:
At least one copy:
N — Deck size
Total number of cards in your deck, usually 60.
K — Successes in the deck
How many copies of the card or category you are looking for.
n — Cards drawn
Your sample size, such as 7 cards for an opening hand.
k — Successes drawn
The exact number of target cards you want to see in that sample.
For example, one copy of Black Lotus in a 60-card deck has roughly an 11.7% chance of appearing in the opening seven. You do not need to calculate the formula every time you build a deck. What matters is what it tells you: more copies increase consistency; fewer copies increase flexibility.
Lands Work the Same Way
With 20 lands in a 60-card deck, an opening hand is most likely to contain two or three lands, while one-land hands are still common enough to matter.
| Lands in opening 7 | Approx. probability |
|---|---|
| 0 | 4.8% |
| 1 | 19.9% |
| 2 | 32.4% |
| 3 | 27.0% |
| 4 | 12.4% |
Whether twenty lands is correct depends on the plan and the curve. An aggressive deck full of cheap spells may be comfortable there. A deck trying to consistently cast four- and five-mana spells probably will not be.
Consistency Has a Cost
Every extra copy of one card means one less slot for something else. Four copies maximise your chance of drawing that card, but also increase the chance of drawing multiples.
Four Lightning Bolts rarely feel excessive because each additional Bolt still does something useful. Four expensive finishers can be very different.
Deckbuilding is therefore a balance between consistency — drawing the cards you need often enough — and flexibility — having enough different tools to deal with different situations.
Every Card Needs a Job
A card should not be in your deck simply because it is powerful. It should be there because it does something your deck needs.
Old School makes it very tempting to fill a deck with iconic cards simply because you can. A deck full of individually powerful cards is not necessarily a good deck.
How Do You Win?
Creatures are the obvious example, but a threat can also be recurring damage, a powerful permanent or an engine that becomes impossible to overcome. Your threats should fit the plan.
What Do You Need to Stop?
Removal, counterspells, discard, artifact or enchantment removal, land destruction and mana denial all stop the opponent from simply executing their own plan.
How Do You Keep Going?
Drawing extra cards is one route. Two-for-ones, recursion and engines that keep producing resources can serve the same purpose.
How Do You Find What You Need?
Demonic Tutor is the most flexible example. Land Tax can repeatedly find basics, Transmute Artifact can find a specific artifact, and selection effects such as Sylvan Library can help locate key pieces without being true tutors.
What Lets the Deck Function?
Moxen, Sol Ring, Birds of Paradise, Dark Ritual and other acceleration can change what your deck is capable of doing — and how early it can do it.
What Holds Everything Together?
Some cards fix mana, answer multiple permanent types or perform different roles depending on the situation. These are often the glue cards that make the rest of the deck work more smoothly.
Synergy: When Cards Become Better Together
Card roles explain what a card does. Synergy explains why it belongs with the other cards in your deck.
Sometimes that synergy is obvious. Erhnam Djinn + Armageddon is a classic example: Erhnam Djinn provides a large threat, while Armageddon can destroy the mana the opponent needs to answer it.
But synergy can also be structural. A deck filled with cheap threats makes Armageddon better because it can establish a board before destroying the lands. A graveyard strategy changes the value of cards that can easily be discarded or sacrificed.
Good Card vs. Good Card for the Deck
A card can be objectively powerful and still make your deck worse. An incredible six-mana creature may simply sit in the opening hand of an aggressive deck that wants to spend the first turns casting one- and two-mana spells.
Likewise, a relatively modest card may be exactly what the deck needs because it fills a gap in the curve, protects the main threat or makes several other cards function better.
The goal is not to make every individual card as powerful as possible. The goal is to make the 60 cards work together.
You Cannot Goldfish Every Game
Your deck is trying to do something, but so is theirs. At some point you need to decide which opposing cards or strategies you simply cannot afford to ignore.
The question is not “What are the best removal spells?” It is “What does my deck need to stop in order for its own plan to work?”
Know What Actually Matters
Not every opposing card deserves an answer. If you try to answer everything, your deck can become too reactive and lose sight of its own plan.
What can stop my deck from functioning?
Identify the cards or effects that interfere directly with your main plan.
What can race me?
Some threats matter not because they disrupt you, but because they simply end the game faster.
What happens if I do nothing?
Sometimes the right answer to a creature is not removal. Sometimes the right answer is simply to kill them first.
Different Decks Need Different Interaction
An aggressive deck generally wants interaction that is cheap and efficient. It may only need to remove one blocker, stop one key spell or buy one extra turn. A control deck may instead be built around answering threat after threat. A combo deck may care less about creatures and more about protecting its engine from discard, countermagic or permanent-based disruption.
The interaction should serve the plan, not replace it.
Deal With What Resolved
Cards such as Swords to Plowshares, Lightning Bolt, Disenchant and Terror answer different classes of threats. The key question is coverage: what can your removal actually hit?
Stop It Before It Resolves
Counterspells are flexible, but timing matters. Leaving mana open always creates the tension between reacting to the opponent and developing your own board.
Attack the Hand
Amnesia and Mind Twist can remove threats, answers or combo pieces before they become a problem. But discard loses value when the opponent has already emptied their hand.
Attack Their Resources
Strip Mine, Sinkhole, Armageddon and Blood Moon can stop an opponent from executing their plan at all — but they work best when your own deck exploits the time they create.
Broad Answers vs. Narrow Answers
Broad answers are useful against many different decks. Narrow answers are stronger against a smaller range of targets. This distinction becomes especially important when deciding which answers belong in the maindeck and which belong in the sideboard.
If too much of your deck consists of narrow interaction, there will be games where you draw cards that simply have no target.
Interaction Is Also About Tempo
An answer does not always need to permanently solve a problem. Sometimes it only needs to buy enough time. A cheap spell that answers a more expensive card creates a mana advantage; a temporary answer that opens one extra attack may be all an aggressive deck needs.
Build the Sideboard as Part of the Deck
The sideboard is not a separate collection of fifteen good cards. It is part of the deck.
Your maindeck is built to function against a broad field. The sideboard lets you become more precise once you know what the opponent is doing.
Start With the Matchups
Ask which matchups are already good, which are close, and which are genuinely difficult. There is little value in spending five sideboard slots improving a matchup you already win comfortably.
A sideboard is built for a field, not for a theoretical list of every deck that exists. Spend your limited slots where they are most likely to matter. If you expect to face certain archetypes regularly, those expectations should influence how much sideboard space you devote to them.
Know What Comes Out
A sideboard card is only useful when you know what it replaces. It is easy to say “I bring in three cards against The Deck.” The harder question is “Which three cards leave the maindeck?”
For every matchup, try to know both sides of the exchange: what comes IN, and what goes OUT.
It can help to think beyond individual swaps and picture the 60 cards you actually want to present after sideboarding. Then make sure your complete 75 can produce those versions without damaging the mana curve, mana base or core game plan.

Sideboard the Problem, Not the Deck Name
Try not to think only in terms of “This card is for Mono Black.” Think about the actual problem: graveyard recursion, artifacts, enchantments, large creatures, countermagic, mana denial, direct damage, a combo or a long attrition game.
That way, one sideboard card may solve the same problem across several different matchups.
Broad Tools
Flexible cards can improve several matchups and are rarely completely dead. The gain in any one matchup may be smaller, but the slot works more often.
Silver Bullets
Narrow cards can dramatically swing one strategy while doing almost nothing elsewhere. They are powerful, but each one asks more from your limited fifteen slots.
Do Not Oversideboard
A common mistake is bringing in every card that is technically useful. An Aggro deck can accidentally remove too many threats. A Control deck can overload on narrow answers. A Combo deck can sideboard out so many engine pieces that it struggles to assemble its own win.
Your sideboard should improve the plan, not replace it.
Your Role Can Change After Sideboarding
A deck that plays aggressively in game one may need to slow down after sideboarding because the opponent brings in better answers. A Midrange deck may become more controlling against Aggro and more aggressive against Control.
You are not simply swapping cards. You are adjusting how you intend to play the matchup.
Know Your Role — Who Is the Aggressor?
Your deck’s usual archetype does not automatically determine your role in every matchup. Sometimes the faster deck needs to slow down, and sometimes the normally controlling deck must become the aggressor before the opponent’s stronger late game takes over.
Ask which player benefits if the game goes long. If that is your opponent, you may need to apply pressure even with a deck that usually prefers to react. If your deck has the stronger late game, your priority may instead be to survive, trade resources and avoid taking unnecessary risks.
Sideboarding can change that relationship. New answers, resilient threats or additional disruption may shift who needs to attack and who can afford to wait.
Write Down a Sideboard Plan
Against Aggro
IN: cheap removal, life gain, efficient blockers.
OUT: slow card advantage, expensive threats.
Against Control
IN: resilient threats, disruption, difficult-to-answer permanents.
OUT: narrow creature removal.
Against Combo
IN: disruption, countermagic, targeted answers.
OUT: cards that neither interact with the combo nor apply meaningful pressure.
The exact cards vary from deck to deck. The important part is that the decisions are deliberate rather than improvised five minutes before game two.
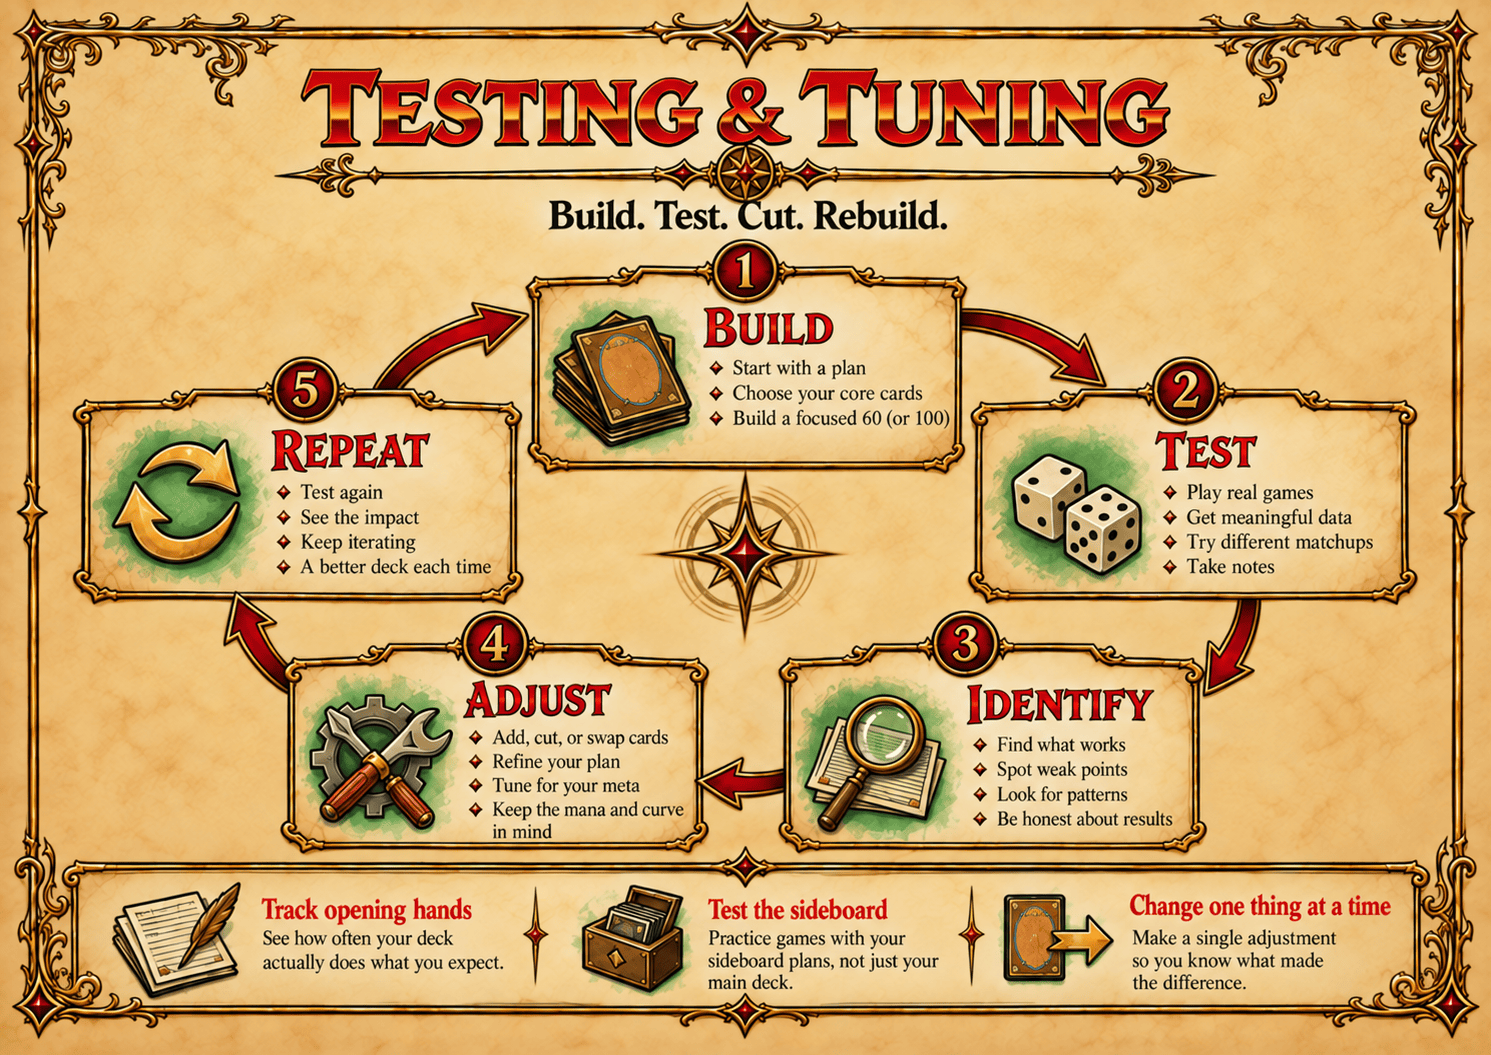
Build. Test. Cut. Rebuild.
A deck is not finished when the last card is sleeved. That is when the real work starts.
Testing is where you find out whether the deck actually does what you designed it to do. Not whether it can win a game, but whether the plan, curve, numbers, interaction and sideboard all work together consistently.
A few good draws can make almost any deck look impressive. A few bad draws can make a good deck look terrible. The goal is to look past individual results and find the patterns underneath them.
Start With the Opening Hands
Draw opening hands and ask: Can I cast my spells? Do I have something meaningful to do in the first few turns? Does this hand support the plan? Are there cards I keep seeing that are difficult to use?
This is one of the quickest ways to expose problems with the mana curve, colour requirements or card numbers.
Goldfish the Deck
Run through the first several turns as though the opponent is doing nothing and see how smoothly the deck develops. Goldfishing is particularly useful for testing mana development, sequencing, combo assembly, how quickly an Aggro deck applies pressure and how often important cards appear on time.
It cannot tell you whether the deck is good against real opposition, but it can tell you whether the deck is capable of executing its own plan.
Test Against Real Decks
Try several different types of opponents rather than repeating the same matchup. You want to know how the deck behaves against Aggro, Control, Combo and flexible Midrange / Tempo strategies.
The goal is not to have a great matchup against everything. Every deck has weaknesses. You are trying to understand where those weaknesses are and whether they are acceptable.
Test the Sideboard Too
Testing does not stop after game one. Play post-sideboard games and ask whether the cards you brought in actually improved the matchup, whether you knew what to take out, and whether the deck still functioned after sideboarding.
Look for Patterns, Not Individual Games
Are you regularly short on mana? Do you flood too often? Do certain cards sit in your hand? Are you constantly wishing one card were something else? Do you lose because you cannot answer a certain permanent? Does the deck run out of threats?
Repeated problems are much more useful than individual wins or losses.
Do Not Test by Results Alone
Winning does not automatically mean the deck worked well, and losing does not automatically mean it failed. You can win despite drawing badly, or lose after the deck performed exactly as intended because the opponent simply had the better draw.
The better question is: Did the deck give me a reasonable chance to execute the plan?
Change One Thing at a Time
When something is not working, resist replacing ten cards at once. Change one card. Adjust a number. Add one mana source. Move one narrow answer to the sideboard. Then test again.
Deck tuning is easier when you can connect the result to the change that caused it.
Keep Notes
You do not need an elaborate spreadsheet. Record what worked, what felt awkward, which cards impressed or disappointed, and whether the sideboard plan made sense. Patterns appear quickly when you write them down.
Mulligans Are Part of the Test
Pay attention to how often you mulligan and why. Frequent hands with the wrong mana, too many expensive cards or no meaningful action can expose problems even when the final decklist looks reasonable.
Know When to Stop Tuning
There is always another card to try, another land to change or another sideboard slot to adjust. At some point, more changes stop making the deck better and simply make it different.
The goal is not a perfect deck. It is a deck with a clear plan that executes that plan consistently and gives you confidence when you sit down to play.
The Final Test
At the end of the process, you should be able to answer the same questions we started with:
What is my deck trying to do?
Can it do that on the turns when it matters?
Do I draw the important parts often enough?
Does every card have a job?
Can I interact with the things that stop my plan?
Does my sideboard improve the matchups I built it for?
If the answer to those questions is yes, you probably have something worth sleeving up.
There Is No Single Formula for a Great Old School Deck
The strongest decks usually come from understanding what you want the deck to do, making sure the mana and numbers support that plan, choosing cards that work together, and then being willing to test and change what does not.
That is the real point of deckbuilding. Not to find sixty individually powerful cards. Not to copy a list without understanding why it works. But to build something where every card has a purpose, every choice supports the plan, and the deck becomes more consistent every time you play it.
Use the principles on this page as a framework, not a set of hard rules. Old School rewards experimentation, strange ideas and finding value in cards that other players may overlook.
Build the deck. Play the games. Learn what works. Then build it again.
Learn From Decks That Already Work
The Deck Primers show how established Old School archetypes turn these principles into actual card choices, mana bases and game plans.
